Assign value to on-site actions and combine them with UTM data to see which behaviors matter most - then follow the steps below to set it up.
AesirX CMP Freemium is a privacy-first Consent Management Platform built for consent-before-tracking. It helps you collect and manage user consent while holding back scripts, cookies, and tracking technologies until a user choice is recorded.
The Freemium version provides a no-cost CMP baseline with no page limits, visitor caps, or artificial site size restrictions. It includes consent banner templates, region-aware consent logic (including GPC and geo-handling), Consent Logs, and Consent Shield Lite for plugin blocking and category mapping.
Step 1: Login
Log in to your WordPress admin panel, navigate to Plugins > Add New.

Step 2: Find AesirX CMP for WordPress
Search for “AesirX Consent” and Install.

Step 3: Install and Activate
After installation, click "Activate".

Once the plugin is active, take time to review and configure the core settings that control how consent behaves on your site. These options define what is allowed to run, when it can run, and under which conditions. A compliant setup depends on making the right choices for your site and use cases.
Step 4: Configure Consent Shield Lite
Review how tracking is held back until consent is given. Consent Shield Lite allows you to configure settings to block WordPress plugins and scripts by category, domain, or path, so non-essential tracking does not run before a user choice is recorded.
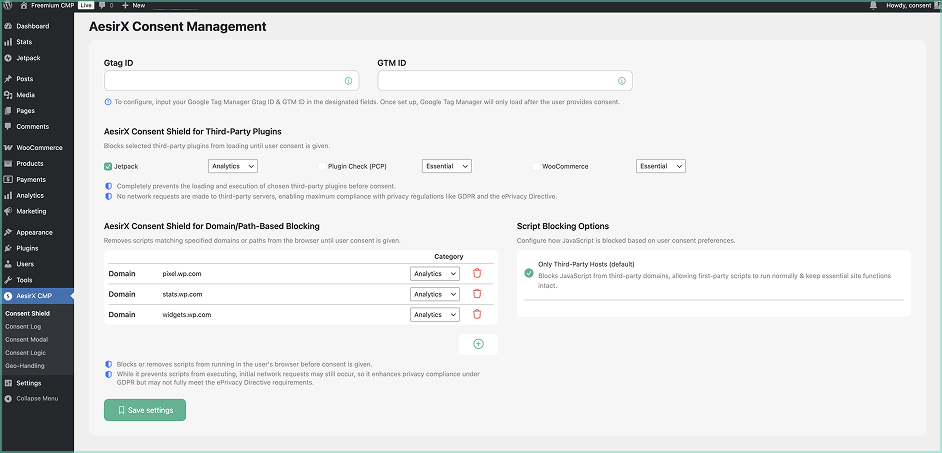
Google Tag Manager Integration
Enter your Google Analytics (Gtag) and Google Tag Manager (GTM) IDs in the fields to connect your tracking setup with AesirX CMP.
Once configured, GTM will only load after the user provides consent, enabling compliance with GDPR and the ePrivacy Directive.
AesirX Consent Shield for Third-Party Plugins
Use this section to control which WordPress plugins are allowed to load before consent.
- Select a supported third-party plugin from the list.
- Assign it to the correct consent category (for example Analytics or Essential).
- Plugins assigned to non-essential categories are blocked until consent is given.
- Changes apply immediately to frontend behavior when you save settings.
AesirX Consent Shield for Domain/Path-Based Blocking
Use this section to block third-party scripts that are not managed by a plugin.
- Add the domain or partial path of the script you want to control.
- Assign it to the relevant consent category.
- Scripts are prevented from executing until the user consents.
- Review entries carefully, as some scripts may still initiate network requests.
Script Blocking Options
Use this setting to define how JavaScript is handled before consent.
- Keep the default Only Third-Party Hosts option for most setups.
- Third-party JavaScript is blocked until consent is recorded.
- First-party scripts continue to run to avoid breaking site functionality.
- Test your site after changes to confirm expected behaviour.
Step 5: Configure Consent Log
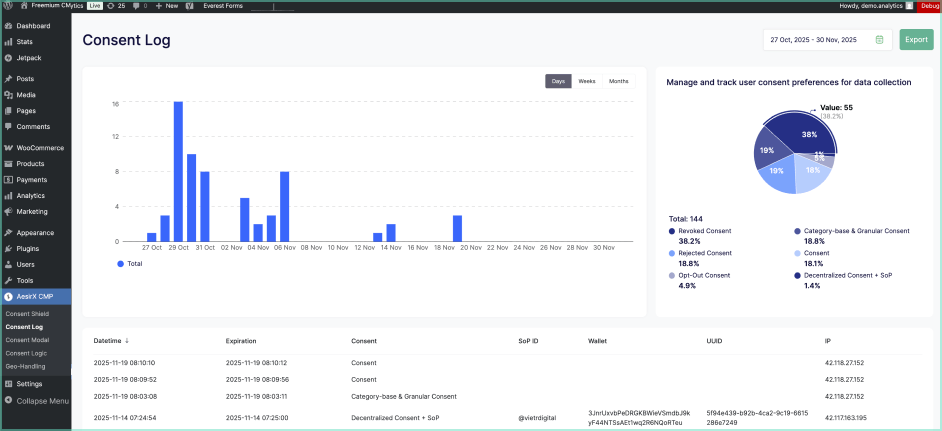
Record consent actions such as opt-ins, opt-outs, changes, and revocations in a timestamped, exportable log to support audits and evidence needs.
- View consent activity by day, week, or month.
- See a visual breakdown of consent types (consent, rejection, granular, revoked).
- Get a table of records including timestamp, consent status, expiration, SoP ID, wallet (if used), UUID, and IP address.
- Export consent logs for reporting or record-keeping.
Step 6: Consent Modal
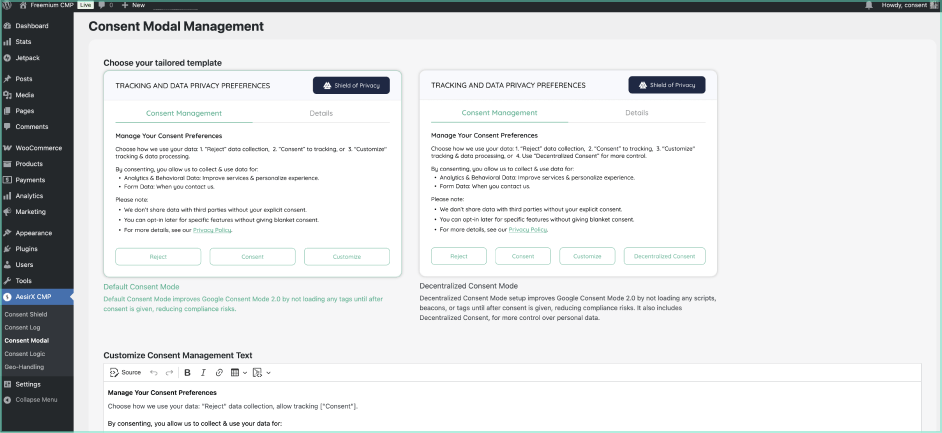
Check the consent banner shown to users. You can select a template, adjust wording for consent, rejection, and cookie declaration, and choose from 40+ language options to match your site and audience.
Choose Your Tailored Template
Select from two drafted templates to help reduce compliance risks by preventing early tracking:
- Default Consent Mode: When set up, improves compatibility with Google Consent Mode 2.0 by blocking all tags until after consent is given.
- Decentralized Consent Mode: As above but also includes Decentralized Consent, giving users greater control over their personal data.
Customize Consent Management Text
Here’s where you can edit the main message users see when the banner appears. Explain what data is collected, why consent is requested, and link to your own Privacy Policy (not the AesirX example).
Customize Cookie Declaration Text
Edit the text shown in the Cookie Declaration section. This content explains what cookies or similar technologies are used on your site, their purpose, and how they relate to the selected consent categories. Use this area to make sure the declaration reflects your actual setup and is written in clear, user-friendly language.
Customize Details Text
Update the “Details” tab here. Provide a clear explanation of each consent option (Reject, Consent, Decentralized Consent if used). Use plain language to help users understand the impact of each choice.
Customize Reject Text
Edit the text shown when a user selects Reject. Use this section to explain what remains active, what is limited when non-essential tracking is rejected, and which options are still available. Keep the wording clear and neutral. Rejection should not add pressure or friction and must be as understandable as acceptance.
Step 7: Consent Logic
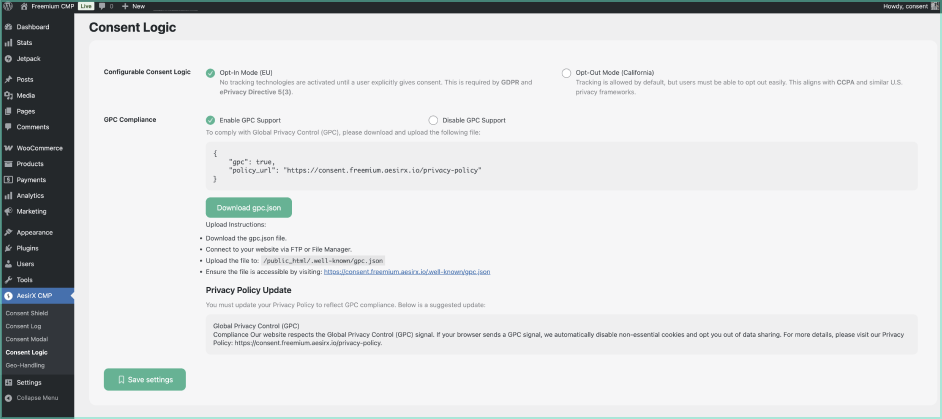
Configure consent mode (opt-in (for EU) / opt-out (for US/CCPA)) and Global Privacy Controls (GPC) behavior, where applicable, to support compliance worldwide.
Configurable Consent Logic
Select the mode that matches your site’s audience and legal requirements:
- Opt-In Mode (EU)
Use opt-in consent where non-essential tracking remains inactive until a user explicitly accepts. This mode is intended for regions that require prior consent before tracking.
- Opt-Out Mode (US / CCPA)
Allow tracking by default while providing users with a clear option to opt out. This mode is commonly used for U.S.-style privacy frameworks.
GPC Compliance
Enable GPC Support to respect browser-sent GPC signals by applying opt-out behaviour for non-essential tracking. When GPC is enabled, download the gpc.json file provided in the CMP. Always update your Privacy Policy to reflect GPC handling.
These settings do not apply automatically. Review and configure them carefully to match how consent should function on your site.
Step 8: Geo-Handling

Set consent modes using browser language, time zone, and rule-based conditions. This allows you to apply opt-in or opt-out behaviour without relying on IP-based geolocation, using clear AND/OR rules for predictable regional handling.
- Opt-In for GDPR-style regions (e.g., EU).
- Opt-Out for laws like CCPA (e.g., California).
Want more control and insight?
Upgrade to CMP Pro to access optional tools that extend your consent setup beyond the essentials.
With CMP Pro, you can add:
- Consent Shield (Full) to apply Permanent Block and advanced blocking modes for stronger control over scripts and plugins.
- Consent Analytics to review consent rates, trends, and user responses over time.
- AI Privacy Advisor for guided setup reviews and draft privacy documentation based on your configuration.
- AI Auto-Blocking to apply blocking rules using real scan data.
- Privacy Scanner to detect tracking technologies and potential compliance risks.
- ID Verification to add optional age or identity checks using zero-knowledge proofs for regulated use cases.


